精品软件与实用教程
亚马逊云科技官网:https://www.amazonaws.cn
亚马逊云海外官网:https://aws.amazon.com/cn/
它们的区别大致如下:
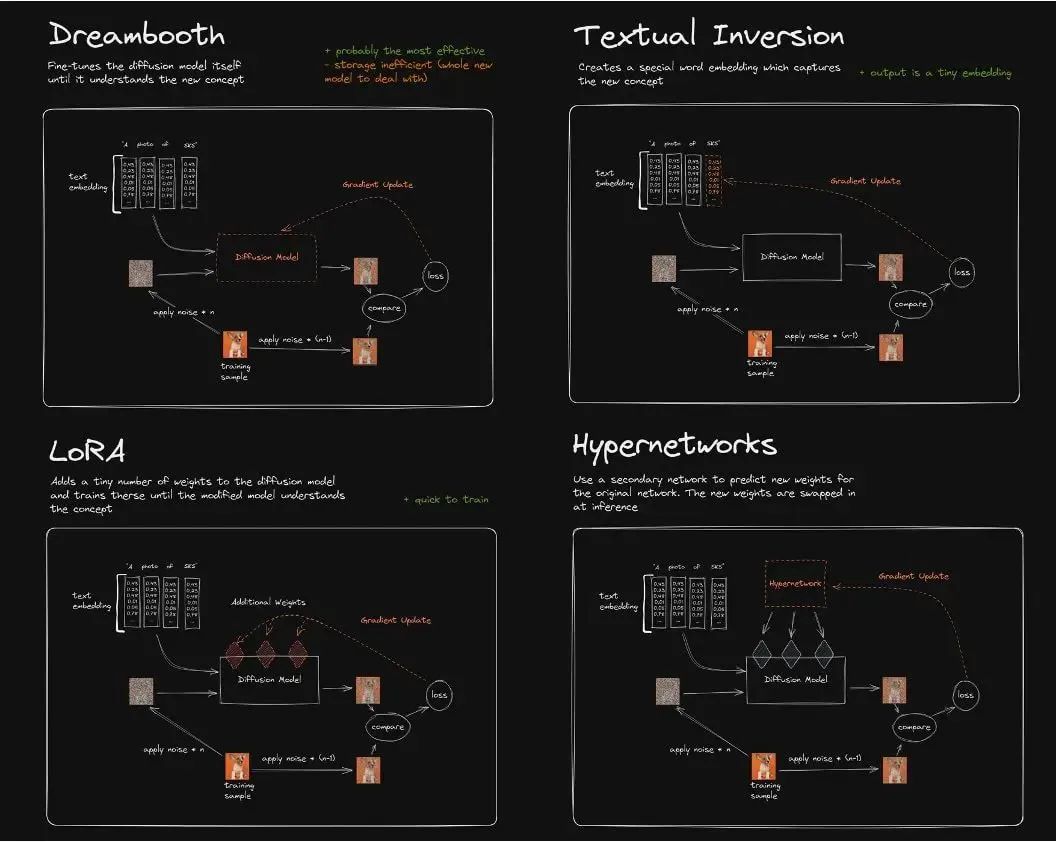
DreamBooth 算法对 Imagen 模型进行了微调,从而实现了将现实物体在图像中真实还原的功能,通过少量实体物品图像的 fine-turning,使得原有的 SD 模型能对图像实体记忆保真,识别文本中该实体在原图像中的主体特征甚至主题风格,是一种新的文本到图像“个性化”(可适应用户特定的图像生成需求)扩散模型。
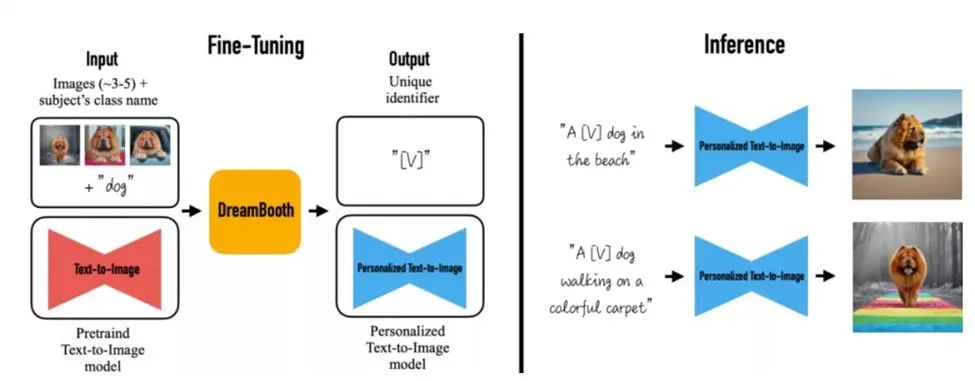
目前业界对 DreamBooth 做 fine tuning 主要为两种方式:
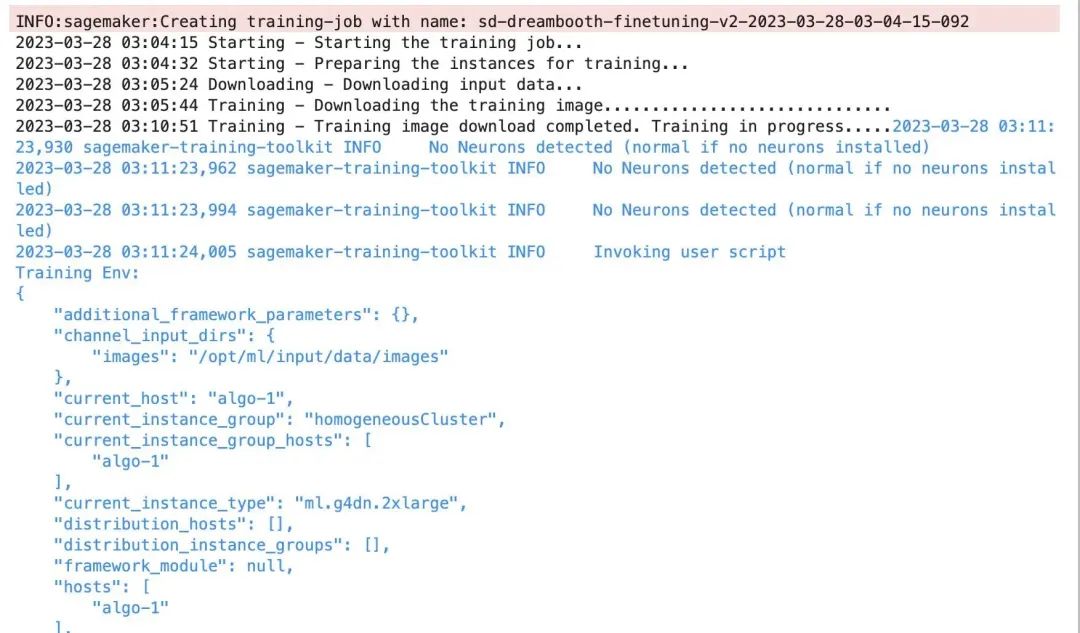
以下详细介绍了在 Amazon SageMaker 上,使用 BYOC 模式的 training Job,进行 Dreambooth fine tuning 的方式方法,并针对 Dreambooth 训练过程的显存开销、模型管理、超参等进行了优化实践,从而实现用户在自己的 ML 平台或业务系统的的工程化落地,并降低训练的整体 TCO。
model_dir='/opt/ml/input/fineturned_model/'
 model = StableDiffusionPipeline.from_pretrained(
        model_dir,
        scheduler = DPMSolverMultistepScheduler.from_pretrained(model_dir, subfolder="scheduler"),
        torch_dtype=torch.float16,
        )
images_s3uri = 's3://{0}/dreambooth/images/'.format(bucket)
inputs = {
    'images': images_s3uri
}

estimator = Estimator(
    role = role,
    instance_count=1,
    instance_type = instance_type,
    image_uri = image_uri,
    hyperparameters = hyperparameters,
    environment = environment
)
estimator.fit(inputs)

注意 xformers 在 Amazon G4dn,G5 上的编译安装,需要 cuda 11.7,torch 1.13以上版本,且 CUDA_ARCH_LIST 算力参数需要设置为8.0以上,否则编译会报该类型 GPU 算力不支持。
编译打包的 docker file 参考如下:
FROM pytorch/pytorch:1.13.0-cuda11.6-cudnn8-runtime
ENV PATH="/opt/ml/code:${PATH}"
ENV DEBIAN_FRONTEND noninteractive
RUN apt-get update
RUN apt-get install --assume-yes apt-utils -y
RUN apt update
RUN echo "Y"|apt install vim
RUN apt install wget git -y
RUN apt install libgl1-mesa-glx -y
RUN pip install opencv-python-headless
RUN mkdir -p /opt/ml/code
RUN pip3 install sagemaker-training
COPY train.py /opt/ml/code/
COPY ./sd_code/ /opt/ml/code/
RUN pip install -r /opt/ml/code/extensions/sd_dreambooth_extension/requirements.txt
ENV SAGEMAKER_PROGRAM train.py
RUN export TORCH_CUDA_ARCH_LIST="7.5 8.0 8.6" && export FORCE_CUDA="1" && pip install ninja triton==2.0.0.dev20221120 && git clone https://github.com/xieyongliang/xformers.git /opt/ml/code/repositories/xformers && cd /opt/ml/code/repositories/xformers && git submodule update --init --recursive && pip install -r requirements.txt && pip install -e .
ENTRYPOINT []
algorithm_name=dreambooth-finetuning-v3
account=$(aws sts get-caller-identity --query Account --output text)
# Get the region defined in the current configuration (default to us-west-2 if none defined)
region=$(aws configure get region)
fullname="${account}.dkr.ecr.${region}.amazonaws.com/${algorithm_name}:latest"
# If the repository doesn't exist in ECR, create it.
aws ecr describe-repositories --repository-names "${algorithm_name}" > /dev/null 2>&1
if [ $? -ne 0 ]
then
aws ecr create-repository --repository-name "${algorithm_name}" > /dev/null
fi
# Log into Docker
pwd=$(aws ecr get-login-password --region ${region})
docker login --username AWS -p ${pwd} ${account}.dkr.ecr.${region}.amazonaws.com
# Build the docker image locally with the image name and then push it to ECR
# with the full name.
mkdir -p ./sd_code/extensions
cd ./sd_code/extensions/ && git clone https://github.com/qingyuan18/sd_dreambooth_extension.git
cd ../../
docker build -t ${algorithm_name}  ./ -f ./dockerfile_v3 > ./docker_build.log
docker tag ${algorithm_name} ${fullname}
docker push ${fullname}
rm -rf ./sd_code
github 上相关资料:
github 上 sd_extentions 的代码:
https://github.com/d8ahazard/sd_dreambooth_extension
如上文所述,SD WebUI 无法和后端业务系统整合,因此我们需要将其从 WebUI 插件方式剥离,根据基础模型、输入图像、instance prompt、class prompt 等标准输入和 fine tuning 后模型输出,独立封装成单独的模型训练程序。
if shared.force_cpu:
import modules.shared
    no_safe = modules.shared.cmd_opts.disable_safe_unpickle
    modules.shared.cmd_opts.disable_safe_unpickle = True
from helpers.mytqdm import mytqdm
清理后的 sd_extentions 代码可以参见 https://github.com/qingyuan18/sd_dreambooth_extension.git,可以看到这里面只保留了核心 train 训练模块,webui.py、helper、shard 等前端耦合相关代码都已经清理。
hyperparameters = {
        'model_name':'aws-trained-dreambooth-model',
        'mixed_precision':'fp16',
        'pretrained_model_name_or_path': model_name,
        'instance_data_dir':instance_dir,
        'class_data_dir':class_dir,
        'with_prior_preservation':True,
        'models_path': '/opt/ml/model/',
        'manul_upload_model_path':s3_model_output_location,
        'instance_prompt': instance_prompt,
        ……}
estimator = Estimator(
role = role,
instance_count=1,
instance_type = instance_type,
image_uri = image_uri,
hyperparameters = hyperparameters
)
如果客户生产环境中,是 ckpt 格式的单个模型文件(如从 civit.ai 站点下载的模型),那么我们可以通过 diffuser 官方提供的转换脚本 ,将其从 ckpt 格式转为 diffuser 目录格式,以便同样的代码在生产环境中进行加载,脚本使用示例如下:
python convert_original_stable_diffusion_to_diffusers.py —checkpoint_path ./models_ckpt/768-v-ema.ckpt —dump_path ./models_diffuser
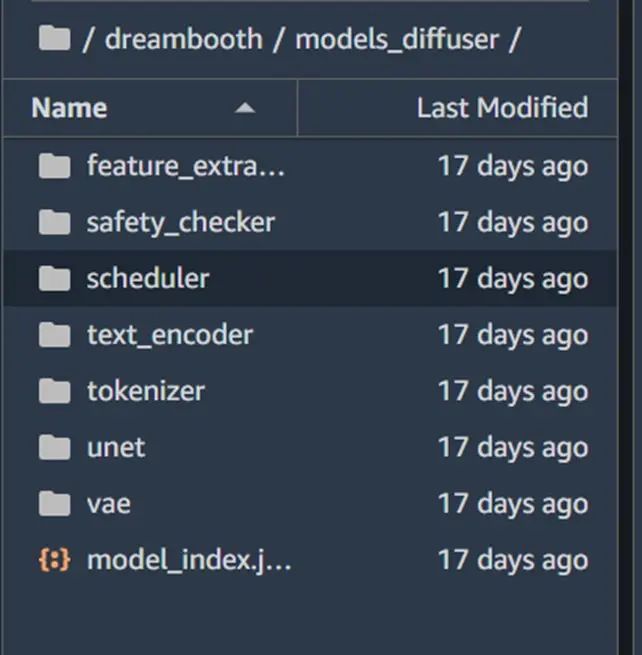
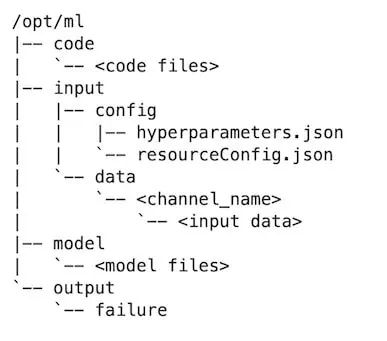
因此我们加入一个 manul_upload_model_path 参数,指定训练后的模型文件手工上传的 S3 路径,训练结束后通过 S3 SDK 递归方式上传整个模型目录到指定 S3,让 SageMaker 不再打包 model.tar.gz。
参考代码示例如下:
def upload_directory_to_s3(local_directory, dest_s3_path):
    bucket,s3_prefix=get_bucket_and_key(dest_s3_path)
    for root, dirs, files in os.walk(local_directory):
        for filename in files:
            local_path = os.path.join(root, filename)
            relative_path = os.path.relpath(local_path, local_directory)
            s3_path = os.path.join(s3_prefix, relative_path).replace("\\", "/")
            s3_client.upload_file(local_path, bucket, s3_path)
            print(f'File {local_path} uploaded to s3://{bucket}/{s3_path}')
        for subdir in dirs:
            upload_directory_to_s3(local_directory+"/"+subdir,dest_s3_path+"/"+subdir)

s_pipeline.save_pretrained(args.models_path)
###  manually upload trained db model dirs to s3 path#####
#### to eliminate sagemaker tar process#####
print(f"manul_upload_model_path is {args.manul_upload_model_path}")
upload_directory_to_s3(args.models_path,args.manul_upload_model_path)
但 g4dn 机型只有单张 16G 显存的英伟达 T4 显卡,Dreambooth 要重训练 unet、vae 网络,来保留先验损失权重,当需要更高保真度的 Dreambooth fine tuning,会多达数十张图片的输入数据,1000 step 的训练过程,整个网络尤其是 unet 网络的图形加噪及降噪等处理,很容易造成显存 OOM 导致训练任务失败。
为了保障客户在 16G 显存的成本优势机型上能够 train Dreambooth 模型,我们做了这几部分的优化,从而使得 Dreambooth fine tuning 在 SageMaker 上只需要 G4dn.xlarge 的机型,数百到3000的 training steps 都可以完成训练,大幅度降低了客户训练 Dreambooth 的成本。
代码示例如下:
print(f"Total VRAM: {gb}")
        if 24 > gb >= 16:
            attention = "xformers"
            not_cache_latents = False
            train_text_encoder = True
            use_ema = True
        if 16 > gb >= 10:
            train_text_encoder = False
            use_ema = False
        if gb < 10:
            use_cpu = True
            use_8bit_adam = False
            mixed_precision = 'no'
在 Dreambooth 训练过程中,将 attention 关注度由默认的 flash 改为 xformer,对比开启 xformers 前后的 GPU 显存情况,可以看到该方法明显降低了显存使用。
开启 Xformers 前:
***** Running training *****
  Instantaneous batch size per device = 1
  Total train batch size (w. parallel, distributed & accumulation) = 1
  Gradient Accumulation steps = 1
  Total optimization steps = 1000
   Training settings: CPU: False Adam: True, Prec: fp16, Grad: True, TextTr: False EM: True, LR: 2e-06 LORA:False
 Allocated: 10.5GB
 Reserved: 11.7GB
***** Running training *****
  Instantaneous batch size per device = 1
  Total train batch size (w. parallel, distributed & accumulation) = 1
  Gradient Accumulation steps = 1
  Total optimization steps = 1000
   Training settings: CPU: False Adam: True, Prec: fp16, Grad: True, TextTr: False EM: True, LR: 2e-06 LORA:False
 Allocated: 5.5GB
 Reserved: 5.6GB
- ‘PYTORCH_CUDA_ALLOC_CONF':‘max_split_size_mb:32′对于显存碎片化引起的 CUDA OOM,可以将 PYTORCH_CUDA_ALLOC_CONF 的 max_split_size_mb 设为较小值。
- train_batch_size':1每次处理的图片数量,如果 instance images 或者 class image 不多的情况下(小于10张),可以把该值设置为1,减少一个批次处理的图片数量,一定程度降低显存使用。
- ‘sample_batch_size': 1和 train_batch_size 对应,一次进行采样加噪和降噪的批次吞吐量,调低该值也对应降低显存使用。
- not_cache_latents 另外,Stable Diffusion 的训练,是基于 Latent Diffusion Models,原始模型会缓存 latent,而我们主要是训练 instance prompt, class prompt 下的正则化,因此在 GPU 显存紧张情况下,我们可以选择不缓存 latent,最大限度降低显存占用。
- ‘gradient_accumulation_steps' 梯度更新的批次,如果训练 steps 较大,比如1000,可以增大梯度更新的步数,累计到一定批次再一次性更新,该值越大,显存占用越高,如果希望降低显存,可以在牺牲一部分训练时长的前提下减少该值。注意如果选择了重新训练文本编码器 text_encode,不支持梯度累积,且多 GPU 的机器上开启了 accelerate 的多卡分布式训练,则批量梯度更新 gradient_accumulation_steps 只能设置为1,否则文本编码器的重训练将被禁用。

#使用了zwx作为触发词, 模型训练好之后我们使用这个词来生成图
instance_prompt="photo\ of\ zwx\  toy"
class_prompt="photo\ of\ a\ cat toy"
#notebook训练代码说明
#设置超参
environment = {
    'PYTORCH_CUDA_ALLOC_CONF':'max_split_size_mb:32',
    'LD_LIBRARY_PATH':"${LD_LIBRARY_PATH}:/opt/conda/lib/"
}
hyperparameters = {
                    'model_name':'aws-trained-dreambooth-model',
                    'mixed_precision':'fp16',
                    'pretrained_model_name_or_path': model_name,
                    'instance_data_dir':instance_dir,
                    'class_data_dir':class_dir,
                    'with_prior_preservation':True,
                    'models_path': '/opt/ml/model/',
                    'instance_prompt': instance_prompt,
                    'class_prompt':class_prompt,
                    'resolution':512,
                    'train_batch_size':1,
                    'sample_batch_size': 1,
                    'gradient_accumulation_steps':1,
                    'learning_rate':2e-06,
                    'lr_scheduler':'constant',
                    'lr_warmup_steps':0,
                    'num_class_images':50,
                    'max_train_steps':300,
                    'save_steps':100,
                    'attention':'xformers',
                    'prior_loss_weight': 0.5,
                    'use_ema':True,
                    'train_text_encoder':False,
                    'not_cache_latents':True,
                    'gradient_checkpointing':True,
                    'save_use_epochs': False,
                    'use_8bit_adam': False
}
hyperparameters = json_encode_hyperparameters(hyperparameters)
#启动sagemaker training job
from sagemaker.estimator import Estimator
inputs = {
    'images': f"s3://{bucket}/dreambooth/images/"
}
estimator = Estimator(
    role = role,
    instance_count=1,
    instance_type = instance_type,
    image_uri = image_uri,
    hyperparameters = hyperparameters,
    environment = environment
)
estimator.fit(inputs)


https://github.com/aws-samples/sagemaker-stablediffusion-quick-kit
Stable Diffusion Quick Kit Dreambooth 微调文档:
Dreambooth 论文:
Dreambooth 原始开源 github: https://colab.research.google.com/github/huggingface/notebooks/blob/main/diffusers/sd_dreambooth_training.ipynb#scrollTo=rscg285SBh4M
Huggingface diffuser 格式转换工具:
https://github.com/huggingface/diffusers/tree/main/scripts
Stable diffusion webui dreambooth extendtion 插件:
https://github.com/d8ahazard/sd_dreambooth_extension.git
Facebook xformers 开源:


